Lab 2: Low and High Pass Filters
This lab lets people explore high and low filters using GNU Radio’s blocks programming interface.
Setup
These installation instructions are for people running Windows with OpenSSH already installed (Most modern installations)
Jumpbox Instructions can be found in the Ara User Manual
Install X Display Server On Local Device - A few examples are below
Use default installation settings.
Lease Setup
- Navigate to https://portal.arawireless.org
- Reservations > Leases
- Click “+ create Lease”
- Lease Name: [anything you want]
- Leave Start/End Dates blank
- Click Next
- Site: Sandbox
- Device ID: 00X (ex: 001, 002, etc, just can’t be the same as someone else’s)
- Click Create Lease
Container Setup
- Container > Containers
- Click “+ Create Container”
- Name: [anything you want]
- Image: arawirelesshub/uhd:4.4.0.0
- Leave “Image Driver” and “Image Pull Policy” as defaults
- Command: bash
- Click Next
- Hostname: [anything you want or empty]
- CPU: 4
- Memory: 5120
- Lease name: [select the name of the lease you just created]
- Click Next
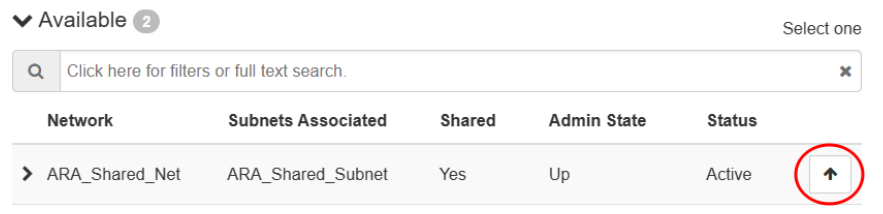
- Click the arrow on the “ARA_Shared_Net” row, like below:
- Click “Create”
- Click on the container name
- Click the “Console” tab
SSH Setup
On the console run these commands replacing [username] with your prefered username:
apt update
apt install openssh-server
service ssh start
useradd -s /usr/bin/bash [username]
passwd [username]
passwd
mkdir /home/[username]
chown [username] /home/[username]
On local device
Open Powershell and run these commands:
ssh -J [jbox-username]@jbox.arawireless.org [container-username]@[floating-ip]
su
You should be signed into the container. On the container run these commands:
xauth
Ctrl + c to exit xauth
touch /root/.Xauthority
exit
xauth
Ctrl + c to exit xauth
touch /home/[username]/.Xauthority
su
apt install -y gnuradio git cmake g++ libboost-all-dev libgmp-dev swig python3-numpy python3-mako python3-sphinx python3-lxml doxygen libfftw3-dev libsdl1.2-dev libgsl-dev libqwt-qt5-dev libqt5opengl5-dev python3-pyqt5 liblog4cpp5-dev libzmq3-dev python3-yaml python3-click python3-click-plugins python3-zmq python3-scipy python3-gi python3-gi-cairo gir1.2-gtk-3.0 libcodec2-dev libgsm1-dev libusb-1.0-0 libusb-1.0-0-dev libudev-dev python3-pip nano xorg openbox && pip install plotext && pip install matplotlib && pip3 install --user --upgrade manchester-code
nano ~/.bashrc
Add the following lines to the end of the file:
export PYTHONPATH="${PYTHONPATH}:/usr/local/local/lib/python3.10/dist-packages/"
export UHD_IMAGES_DIR=/usr/local/share/uhd/images
export QT_QPA_PLATFORM_PLUGIN_PATH=/usr/lib/x86_64-linux-gnu/qt5/plugins/platforms
Ctrl + S and Ctrl + X to save and close
source ~/.bashrc
uhd_images_downloader
nano /etc/ssh/sshd_config
Uncomment out and change the following line to this:
X11UseLocalhost no
Ctrl + S and Ctrl + X to save and close
service ssh restart
exit
exit
Start X Forwarding Session
Open XLaunch or Xming on local device (keep clicking next through all menus, leaving everything default) depending on X Server installed above
Go back to powershell and run these commands:
$env:DISPLAY = '127.0.0.1:0'
ssh -v -Y -J [jbox-username]@jbox.arawireless.org [container-username]@[floating-ip]
xauth list
Copy returned line to clipboard
su
xauth add [line copied to clipboard]
Test X Forwarding
xclock
Start GNU Radio
gnuradio-companion
Hardware Filter Lab
Setup Environment
You either follow the instructions below or clone the website’s GitHub for /python_lab_scripts/high_low_freq_scan.grc a premade GNU Radio Flow Graph. All blocks can be searched for using Ctrl+f
GNU Radio should automatically open a new project.
Double click the options block and set the parameters like below:
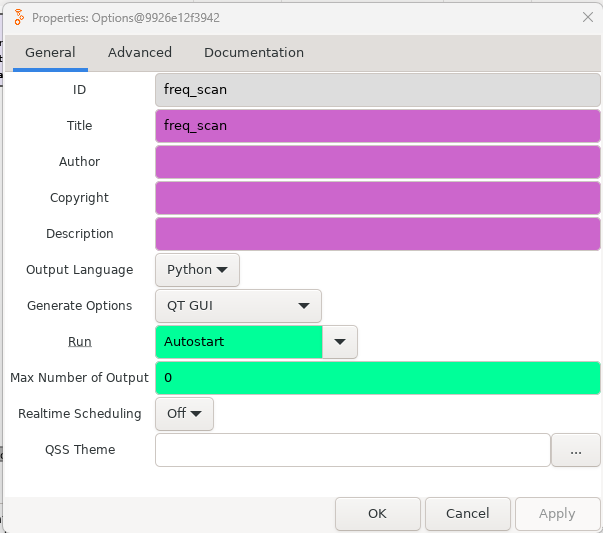
Save and close the window
Double click the samp_rate variable block and set the parameters like below:
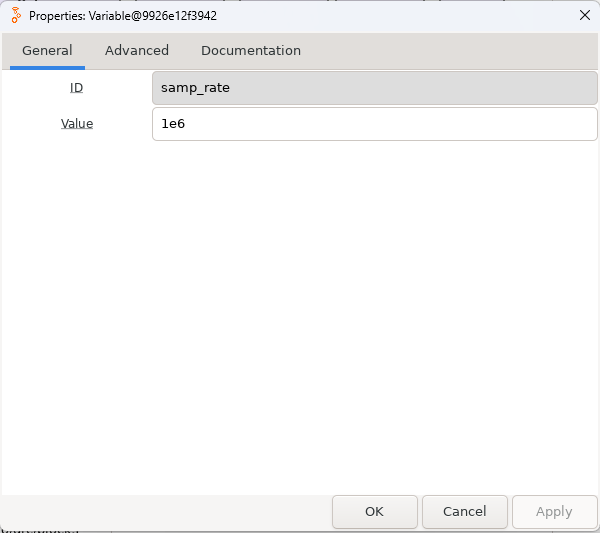
Save and close the window
Add three more variables for cutoff_freq, tran_width, and gain then set the parameters as follows:

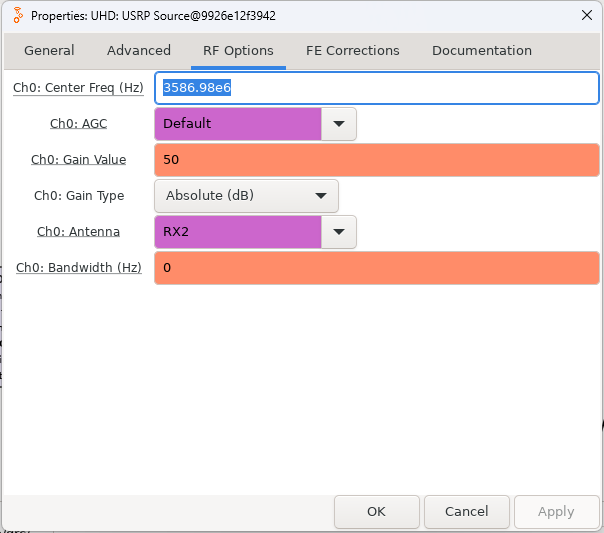
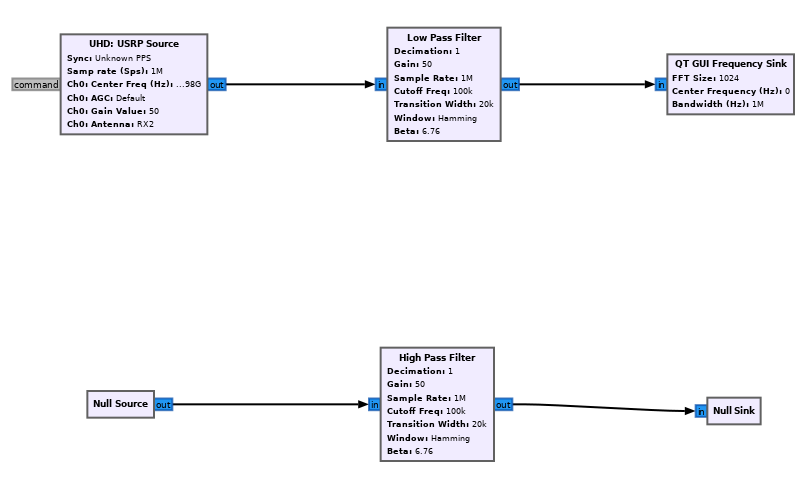
Add a USRP Source Block and set the parameters under the RF Options tab as follows:
Add a High Pass and a Low Pass Filter Block and set the parameters as follows (Same for both):

Add QT GUI Frequency Sink Block, Null Source, and Null Sink Block. They don’t need to be changed and can be connected as follows:
The Experiment
Press the play button at the top. Examine the frequency graph that is outputted.
Experiment with changing the cutoff frequency and transition width variables and restart the graph.
What changes did you notice with each variable changed?
Flip the Low Pass Filter block out for the High Pass Filter Block.
What has changed with the stopband and passband on the graph that’s outputted?