Indoor/Sanbox OpenAirInterface5g Experiments Using USRPs
Lab1: Setup, Ping, and Throughput measurement with iperf
Platform: Universal Software Radio Peripheral (USRP)
Resources needed: Two USRP B210s, associated host computers, and resources needed for the core network (only if required).
Note
For OAI experiments, you have two options for the core network:
Use the ARA-provided core network: In this case you can use the core network provided by ARA.
Deploy your own core network: Here, you need to reserve another node specifically for the core network and deploy the core network using specific container.
Short Description: The experiment demonstrates establishing a 5G BS-UE link using OpenAirInterface5g and USRPs. The setup includes an OpenAirInterface (OAI) gNB, nrUE, and the 5G Core Network.
Detailed Description: This experiment features a 5G network deployment using containerized 5G software components of OpenAirInterface5g, i.e., a containerized gNB, a containerized UE, and containerized core network deployed on Intel x86 servers. Both gNB and nrUE containers run on general purpose Intel x86 servers which are connected to USRP B210 SDRs via a USB 3.0 cable. The gNB is connected to a 5G core network via a high-speed backhaul link. The following figure shows the 5G BS-UE link created from the experiment.

Detailed Steps for the Experiment
Create three reservations using the Project -> Reservations -> Leases tab from the dashboard.
gNB
Site: Sandbox
Resource Type: AraRAN
Device Type: Host
Device ID: 005
nrUE
Site: Sandbox
Resource Type: AraRAN
Device Type: Host
Device ID: 001
5G_Core (Only if you are using Option 2 on the core network above, i.e., if you are creating your own core network.)
Ideally, the core network can be deployed on any node (such as DataCenter-Compute-000 or DataCenter-Compute-001). For this example, we deploy the core network on the Sandbox-Host-004.
Site: Sandbox
Resource Type: AraRAN
Device Type: Host
Device ID: 004 (or any available node)
Create the following two (or three) containers on the respective nodes using the corresponding reservation IDs. For the containers, the Docker images can be used as follows:
gNB
Container Image:
arawirelesshub/openairinterface5g:oai_gnbCPU: 8
Memory: 8192
Network: ARA_Shared_Net
nrUE
Container Image:
arawirelesshub/openairinterface5g:oai_nrueCPU: 8
Memory: 6000
Network: ARA_Shared_Net
5G_Core
Container Image:
arawirelesshub/openairinterface5g:cnCPU: 4
Memory: 4096
Network: ARA_Shared_Net
Once the containers are launched, take a note on their floating IPs. The containers can be accessed via the console tab of the respective containers in the Project -> Containers tab from the dashboard or using SSH via the jumpbox server. Visit ARA_Jumpbox for more information on accessing containers via jumpbox.
In both gNB and nrUE containers, run the following command to check the radios connected to the host.
# uhd_find_devicesThe output of the above command looks like the following image. You may see multiple B210s since each host is connected to two SDRs.

[Optional: Execute this step only if you are running your own 5G core network. If you are using ARA-provided core network, skip this step.] In the 5G_Core container, run the following commands to start OAI 5G Core.
# cd oai-cn5g
# docker compose up -d
# iptables -P FORWARD ACCEPT
Note the IP address of the interface
eth0in the container by executing the command.# ifconfig eth0For this experiment, we assume that the IP address of the core network container is 10.0.4.100.
To make the gNB connected to your core network, you need to attach the gNB to the AMF of the core network. First note down the IP address of the interface
eth0of the gNB container by executing the following command in the terminal.# ifconfig eth0For this experiment, we assume that the IP address is 10.0.4.44.
Open the gNB configuration file with the following command.
# nano ~/openairinterface5g/targets/PROJECTS/GENERIC-NR-5GC/CONF/gnb.sa.band78.fr1.106PRB.usrpb210.confMake the necessary changes as shown in the figure below. Note that in the following image, provide the IP address you obtained in Step 7. Use /24 subnet mask while specifying the IP address, i.e., 10.0.4.44/24

Further, specify the B210 serial number by changing the line starting with
sdr_addrstosdr_addrs = "serial=8000167";as shown below:
Once the modification is complete, save (Press Ctrl+O) and exit (Press Ctrl+X) the nano editor.
Add a route to the core network from the gNB container with the following command at the gNB container.
Case 1: If you are using ARA-provided 5G core network: Use the following command.
# ip route add 192.168.70.128/26 via 10.0.4.4 dev eth0Case 2: If you are using your own core network: Use the IP address obtained from Step 6 (in this example it is 10.0.4.100) in the command as follows.
# ip route add 192.168.70.128/26 via 10.0.4.100 dev eth0To test the reachability of the 5G Core from the gNB container, run a ping in the gNB container toward the
AMFof the core network.# ping 192.168.70.132In the gNB container, run the OAI gNB using the following commands.
# cd ~/openairinterface5g
# source oaienv
# cd cmake_targets/ran_build/build
# ./nr-softmodem -O ../../../targets/PROJECTS/GENERIC-NR-5GC/CONF/gnb.sa.band78.fr1.106PRB.usrpb210.conf --gNBs.[0].min_rxtxtime 6 --sa -E --continuous-tx
An important parameter that users want to change is the
center
frequency
. Even though it is advisable to keep it default, the center frequency can be modified using the following two parameters.absoluteFrequencySSBdl_absoluteFrequencyPointA
The parameters above take NR ARFCN values for the specific center frequency. You can use the online 5G NR ARFCN Calculator `_ to get the ``absoluteFrequencySSB` in case if you are not familiar with the low-level calculation. To obtain the corresponding
dl_absoluteFrequencyPointA, subtract1272from theabsoluteFrequencySSBvalue.In the nrUE container, run the OAI nrUE using the following commands.
# cd ~/openairinterface5g
# source oaienv
# cd cmake_targets/ran_build/build
# ./nr-uesoftmodem -O ../../../targets/PROJECTS/GENERIC-NR-5GC/CONF/ue.conf -r 106 --numerology 1 --band 78 -C 3604800000 --ue-fo-compensation --sa -E --ue-txgain 0 --usrp-args "serial=8000170" --nokrnmod 1
Console Traces
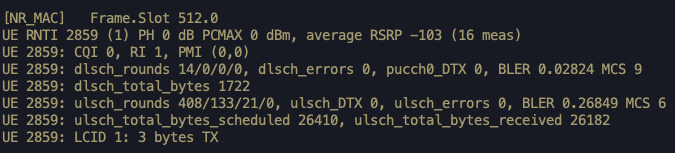
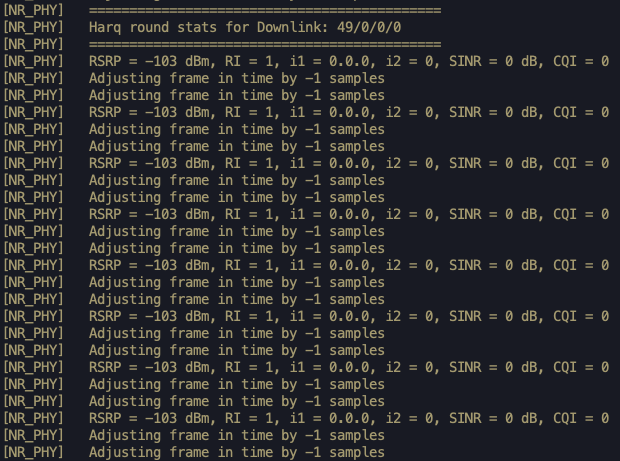
On establishing a successful connection, the commands provide the following output.
gNB Console Trace
nrUE Console Trace
Note
When the connection is established, we can observe a new interface
oaitun_ue1in nrUE with an IP address assigned by the SMF of the core network. In order to find the IP address, open (or SSH into) another terminal for nrUE container and run the commandifconfig. For this experiment, we assume that the IP obtained is10.0.0.2.In this experiment, the interface name assigned to the nrUE by the SMF is given as
oaitun_ue1, which is used in the commands provided in the steps below.Ping test to the Core Network: On the nrUE container, run the following command to ping the core network to ensure stable connection.
# ping -I oaitun_ue1 192.168.70.135An example output of the ping command is shown below.
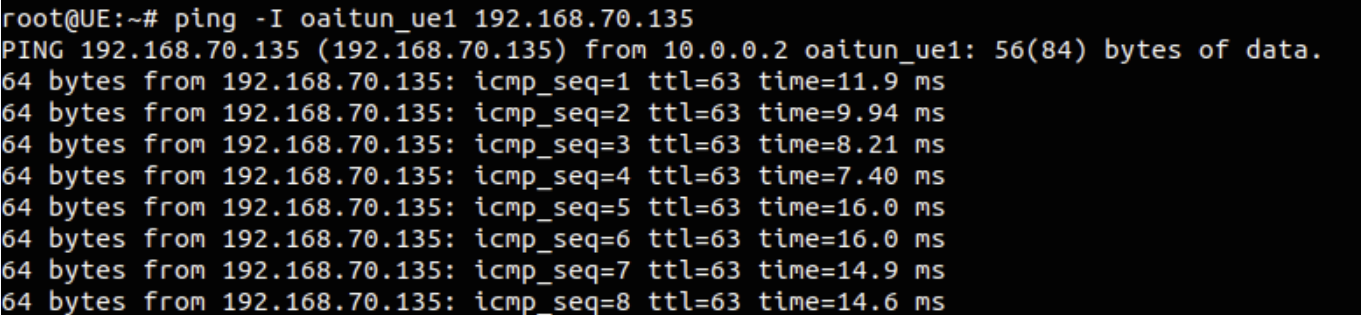
For recording the ping output to a text file (say ping_output.txt), we can use the following command.
# ping -I oaitun_ue1 192.168.70.135 | tee ping_output.txt
Throughput Test
Downlink Throughput: For measuring the throughput, we use the tool iperf. For the downlink throughput, follow the steps below.
Run the iperf server in the nrUE container using the following command. Remember to use the ip address of the
oaitun_ue1interface. In what follows, we assume the IP to be10.0.0.2.# iperf -s -i 1 -u -B 10.0.0.2Run the iperf client in the 5G core container. Remember to use the IP address of the
oaitun_ue1interface in nrUE after the-cflag. In what follows, we assume the UE IP to be10.0.0.2.# docker exec -it oai-ext-dn iperf -c 10.0.0.2 -u -b 10M --bind 192.168.70.135An example iperf trace at nrUE

Uplink Throughput: For the uplink, we need to run the iperf server at the 5G core and iperf client at the nrUE.
For the uplink throughput, first, run the iperf server at the 5G core network.:
# docker exec -it oai-ext-dn iperf -s -i 1 -u -B 192.168.70.135Run iperf client in the nrUE container. Remember to use the IP address of the
oaitun_ue1interface at nrUE after the--bindflag. In what follows, we assume the UE IP to be10.0.0.2.# iperf -c 192.168.70.135 -u -b 2M --bind 10.0.0.2An example iperf trace at 5G Core

Viewing OAI GUI Scope Using X Forwarding
To visualize the GUI elements of the OpenAirInterface (OAI) software on headless machines, we use X11 Forwarding. This method allows graphical programs on the server to use the display capabilities of the local machine. Follow these steps to set up and use X11 Forwarding.
Setup X11 Forwarding
You may refer to detailed section for more information.
Enable X11 Forwarding on the Server: Ensure that the SSH server on your container is configured to allow X11 forwarding. This involves editing the SSH configuration file:
nano /etc/ssh/sshd_configFind the
X11Forwardingline and make sure it is set toyes. If it is commented out, uncomment it and change the setting toyes.X11Forwarding yesAfter making changes, restart the SSH service:
service ssh restart
Prepare the Local Machine: On your local machine, install an X Server software if it’s not already installed. For Windows, you can use Xming or VcXsrv. For macOS, XQuartz is recommended.
Windows Users: Download and install Xming or VcXsrv from their respective websites.
macOS Users: Download and install XQuartz from its official website, then log out and back in to initialize the X Server.
Configure SSH Client for X11 Forwarding: Configure your SSH client to enable X11 Forwarding. This can typically be done with the
-Xor-Yoption (the latter disables some X11 security checks and may be needed for some applications).ssh -v -J [jbox-username]@jbox.arawireless.org [container-username]@[floating-ip]
Note
If you are using PowerShell in Windows, ensure that the SSH_AUTH_SOCK environment variable is set correctly after starting the SSH agent. In PowerShell, you can set this variable by running:
$env:SSH_AUTH_SOCK = "path_to_your_ssh_agent_socket"
ssh-add /path-to-key/
Replace
path_to_your_ssh_agent_socketwith the actual path provided when you start the ssh-agent. This ensures that ssh-add and other SSH operations can correctly communicate with the ssh-agent. If you have used Git Bash to start the ssh-agent and set the variable there, you may need to set it again in PowerShell if running in a different session or window.
Verify X11 Forwarding: To verify that X11 Forwarding is working, try running a simple X11 program like
xeyesorxclockafter connecting:xclock
If the clock or eyes application appears on your local screen, X11 Forwarding is correctly set up.
XForms and QtScope Setup
Install Dependencies for XForms: Before building the XForms scope, you need to install the necessary packages:
sudo apt-get update
sudo apt-get install libforms-bin libforms-dev
Build XForms Scope: Compile the XForms scope by navigating to the build directory and running the build script:
cd ~/openairinterface5g/cmake_targets/
./build_oai --build-lib nrscope --ninja
cd ran_build/build/
cmake -DENABLE_NRSCOPE=ON ../../../ && ninja nrscope
Install Qt5 for QtScope: QtScope requires Qt5 libraries. Install them using:
sudo apt-get update
sudo apt-get install libqt5charts5-dev
Build QtScope: Similar to XForms, compile the QtScope:
cd ~/openairinterface5g/cmake_targets/
./build_oai --build-lib nrqtscope --ninja
cd ran_build/build/
cmake -DENABLE_NRQTSCOPE=ON ../../../ && ninja nrqtscope
Start the OAI gNB with GUI Scope
cd ~/openairinterface5g/cmake_targets/ran_build/build/
./nr-softmodem -O ../../../targets/PROJECTS/GENERIC-NR-5GC/CONF/gnb.sa.band78.fr1.106PRB.usrpb210.conf --gNBs.[0].min_rxtxtime 6 --sa -E --continuous-tx -d --XFORMS
- The
-dswitch enables the GUI. The--XFORMSoption specifies using the XForms graphical interface. Ensure that you adjust these parameters according to which GUI you wish to use, whether XForms or QtScope. 
Example of OpenAirInterface GUI Scope in action.
Note
The GUI may require significant bandwidth and local system resources, especially when running complex visualizations or when network conditions are suboptimal.
Warning
Ensure that any firewalls or network policies in place allow X11 traffic, as it can be blocked on some networks due to security policies.